Multi-Vari Studies, How to Quickly Find 85% of the Variation in a Product or Service

April 23, 2012

The name “Multi-Vari” was given to this form of analysis by L.A. Seder in his classic paper “Diagnosis with Diagrams,” which appeared in Industrial Quality Control in January and March 1950. The premise is to utilize graphics to understand where the variation in a process exists. Is it excessive variation within a single piece, excessive variation from piece to piece, or is the variation excessive from time to time. If we are relating this to service delivery substitute “service delivery to customers”, “service delivery from customer to customer”, and “service delivery from time to time” in the previous sentence.

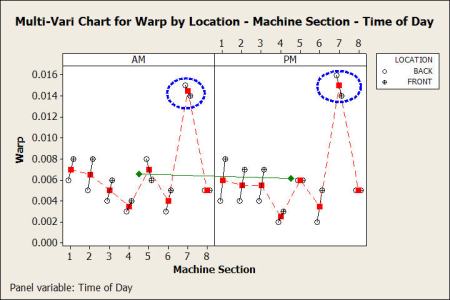
Multi-Vari Studies are often classified as either a “Nested Design” or a “Crossed Design.” In the Nested Design the data is collected without making changes to the process to investigate where the variation is coming from. It could be positional which is within piece variation, it could be cyclical which is consecutive piece-to-piece variation, or it could be temporal which is time-to-time variation such as day-to-day, or week-to-week. The following graphic is an example where we are trying to find the source of process variation with regard to warp in a glass container.


Multi-Vari Nested Design Chart

From this Nested Design Multi-Vari Chart we can clearly see that Machine Section 7 is very different than any other section on the machine. Section 7 becomes the target for variation reduction. The question becomes, “Why is it so different than the rest of the machine?”

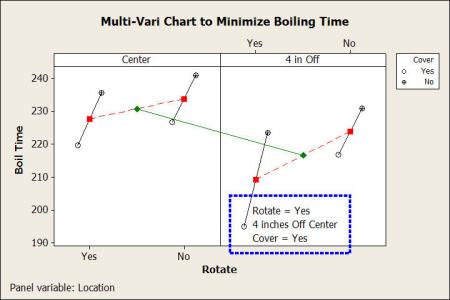
In the Crossed Design the plan is to test changes to the process in a balanced manner following an on or off strategy. In the Crossed Design either 2 or 3 potential variation contributor process variables are studied at 2 different settings. Analysis of Variance is often added as part of the study to provide detailed statistics that support what the graphic analysis portrays. The ANOVA provides the verdict of “guilty beyond a shadow of a doubt” to support what we see graphically. The following graphic is an example where we are trying to minimize the time it takes to boil a cup of water in a microwave oven.

Multi-Vari Crossed Design Chart

From this Crossed Design Multi-Vari Chart it is clear that to minimize the time to boil a cup of water in a microwave oven the container should be rotated, located 4 inches off center, and covered. To add further proof to this graphic finding an ANOVA (analysis of variance) was conducted with the following results.

Analysis of Variance ANOVA Table

The sources of variation are Cover, Rotate, and Location. Each are significant with p values that are less than .0009 (assume worst case for unknown digit of 9) which equates to a confidence level of at least of 99.91%.

Multi-Vari Studies provide a graphic means to quickly find 85% of the variation in a product or service. I think you will find this technique to be useful.
What is the difference between Process Sigma and Process Capability?

November 22, 2011

In both cases of Process Sigma and Process Capability we are talking about performance relative to the Customer’s requirements.  Is there a difference?  Is one measure better than the other?  These are good questions which you will be able to answer by reading on.

The difference between the Six Sigma metric of Process Sigma and Process Capability relates to the definitions of these performance metrics.  In both cases the Customer Specifications are compared to process performance.  For metrics that can be measured on a continuous scale the process mean and standard deviation must be calculated.  If the metrics from the process are discrete, or attributes, then the percent defective is calculated.  In either case the process performance as measured on a control chart should exhibit only natural random patterns of variation, or what is often called common cause variation over time.

Process Sigma

Process Sigma is defined by numeric levels that are related to a process’s output of defects per million opportunities.  Defects are defined as any failure to meet the customer’s specifications.  Process yield is used to look up the Process Sigma level from a table.  Yield is based on Defects (D), Units Processed (N), and the number of Opportunities (O) for a defect to occur.  Once the yield is calculated the Process Sigma can be found in the table below.

Formula for Process Yield

Process Sigma Level Conversion Table

Find the Process Sigma level in the table above.

If the process output can be measured on a continuous scale the process average and standard deviation are used in a formula that compares the average to the closest specification, whether it is the Upper Specification or the Lower Specification we choose the one closest to the process average.  Basically we are making this a one sided specification.  The standard normal distribution is used to estimate the defect rate which can then be converted to yield and use the above table to look up the Process Sigma level.

The other method is to calculate the Z statistic which estimates the number of standard deviation units the average is away from the closest specification which is based on the standard normal distribution.  We then add a 1.5 sigma shift to the calculated Z statistic which gives us the Process Sigma level directly.  The 1.5 sigma shift has been a matter of contention, but it is part of the definition of Process Sigma.  The following is the formula.

Formula for Process Sigma

The definition of Process Sigma is that at a level of 6 on the scale there will be only 3.4 defects per million opportunities.  The process is assumed to remain stable over time and if it drifts in one direction at a time of 1.5 sigma there will be no more than 3.4 defects per million under the tail of the distribution outside of the Customer’s Specification.  When we calculate the Z statistic we add the 1.5 sigma shift to give us the Process Sigma level directly.

Process Capability

Process Capability assessment begins with control charts to evaluate the stability over time for the process.  For the Process Capability study to be meaningful the process must exhibit only common cause variation, which are natural patterns of random variation.

In the case of Attribute, or discrete variables, data the Process Capability becomes the centerline of the Control Chart, or the average p, c, or u depending upon the chart being used.  In the example below the average p, or fraction non-conforming, is 0.076, or 7.6% defective.  The chart is in statistical control so the capability is the overall process average of percent defective.

P Chart exhibitting only common cause variation

In the case of continuous variables data the mean and standard deviation from the stable, or in statistical control, process comes into play.  We will describe 2 of the many Process Capability Indices.  The first is the Cp which compares total process variation to the total width of the specification.  The second is Cpk which takes into consideration centering of the process within the specification so we look at ½ of the process variation compared to the closest specification limit.

The Cp formula below divides the specification width by the measured process spread of 6 standard deviations.  A fully capable process has a Cp = 1.33 or greater.

Formula for Cp Capability Index

The Cpk formula below divides the absolute value of the difference between the process average and the closest specification by ½ of the measured process spread of 3 standard deviations.  A fully capable process has a Cpk = 1.33 or greater.

Formula for Cpk Capability Index

The Cp value indicates how capable a process can become if it is perfectly centered.  The Cpk value indicates how much work is needed to get centered.  In the following table notice that for a Cpk = 1.33 the Process Sigma = 5.5.  A process that operates at a Process Sigma = 6 has a Cpk = 1.5.  The Z Value is the number of standard deviation units away from the specification when the data is converted to a standard normal distribution.

Formula for Z Value

Table of conversions from Z to Cpk and Process Sigma.

Conversion table Z Value to Cpk to Process Sigma

Both measures of performance use that same statistics to be computed.  Whether you prefer Process Capability or Process Sigma the key is to apply the metrics consistently.  To be valid your process must be in a state of statistical control and exhibit only common cause variation.

SIPOC Approach to As Is Analysis

November 1, 2011

SIPOC is an acronym that stands for Suppliers, Inputs, Process Steps, Outputs, and Customers.  This high level process mapping method is ideal for diagnosing and analyzing the current state, or As Is condition of any business process.  The following outlines the SIPOC approach to As Is analysis and improvement solution identification.

The first task is to assemble a small team, 3-5 people, who play roles within the process under analysis that are familiar with the activities that take place within the process.  You may find that this team collectively knows the process from end to end even if some of the team members individually do not.  The team identifies the one key performance metric that defines success or failure for the process.

SIPOC Process Map

SUPPLIERS are the functional groups that provide the essential ingredients for the process to perform.  Create this list may include actual supplier companies that are contracted for goods and services as well as the internal groups and individuals that provide the things that make the process tick.  You may miss a few initially, but you can always add suppliers during the process mapping activity when they are identified.  If the process needs something, which Supplier provides it?

INPUTS are the essential ingredients provided by the Suppliers.  Those ingredients could be materials, goods, services, data, instructions, decisions, documents, analyses, or whatever the process requires.  For each Supplier make a list of all the inputs they provide.

PROCESS STEPS are the 5 high level steps from the beginning to the final outcome for the process.  Start with Step 1 and Step 5.  That defines the end to end scope of the As Is process analysis.  You can think of the process steps as the 5 key value stream steps.  Fill in Steps 2 through 4 after Step 1 and 5 are defined.  The performance metric should be measureable at Step 5 to determine process success or failure.

OUTPUTS are the result of each individual step in the process.  After completing Step 1 what is the thing that is generated by this process step.  In some cases a process step may have multiple outputs.  When you list the outputs they are in groups associated with their respective process step and should flow in order from 1 through 5.

CUSTOMERS are the recipients of the process outputs.  The process step generates something and it goes to a functional group which is either internal to the process or external to the process.

With the SIPOC Process Map completed the team collectively has a better overall understanding of the process from end to end.  Now is the time to challenge the process to identify where the issues are.  What are the causes of either success or failure based on the key performance metric?  Brainstorm using the Cause and Effect, or Fishbone Diagram.  This technique identifies the potential causes of the process issues.

To develop solutions the SCAMPER brainstorming technique is very useful.  In this structured method the SCAMPER acronym is used to challenge the process for improvements by asking what could be Substituted, Changed, Adapted or Amplified, Modified, Put to other uses, Eliminated, or Replaced / Removed / Rearranged.  Now you know the SIPOC approach to As Is analysis and improvement solution identification.


Designing Environmental Sustainability Programs using Process Design for Six Sigma

September 5, 2011

Environmental Sustainability is in the best interest of the Global Economy and Global Corporate Citizenship.  More and more companies are global in nature especially when you consider their supply chains and the total life cycle of their goods and services.  Environmental consciousness is increasing in importance and a key for competing in the global economy.

Customizing your company’s approach to defining and applying environmental best practices requires a systematic approach for process design.  Process Design for Six Sigma (DFSS) follows a five phased approach, namely Define, Measure, Analyze, Design, and Validate (DMADV).

The Define Phase is the Development Project Definition.  In this phase the scope, or depth and breadth, of the Environmental Sustainability Program is defined.  Here is where the resources are committed to the project, the project is planned, and the review points with specific deliverables are defined.

The Measure Phase is Requirements Definition.  In this phase the Voice of the Customer (VOC) is captured which in turn is translated in the requirements for the Environmental Sustainability Program.  The VOC comprises your suppliers, your company, your customers, and the countries where you conduct business.  This comprehensive view of the VOC requirements drives the right sizing of the program.  A Functional Model of what Environmental Sustainability has to accomplish and provide is aligned and prioritized using the VOC.  At this stage requirements are fully defined.

The Analyze Phase is better described as the Conceptual Design.  What must be accomplished to meet the VOC has been documented with the prioritized functional model.  To meet the functional requirements processes are designed at the conceptual level using the SIPOC (Suppliers, Inputs, Process Steps, Outputs, and Customers) Process Mapping method.  In this method only five process steps are addressed which keeps the maps at a high level.  Information System requirements are defined to support each SIPOC Process that has been designed.  Performance Metrics are also defined.  Estimates of cycle frequency, cycle time, and staffing for each SIPOC all also determined.  Organizational requirements are conceptualized as well.

The Design Phase is Detailed Design.  The conceptual designs are now converted into detailed process maps.  This is the future state design of the Environmental Sustainability Program’s processes for execution.  Pilot testing takes place at this stage along with finalizing organizational requirements.  Work instructions, procedures, and policies are documented for efficient execution of the processes that will drive the Environmental Sustainability Program.

The Validate Phase is the final phase of DMADV.  In this phase the new processes go through final testing and debugging of support systems, validation of performance metrics, and implementation on a full scale.

Process Design for Six Sigma is the structured approach for any organization to determine just what Environmental Sustainability means for them.  Process DFSS guides the development of the processes that will meet your Environmental Sustainability goals and objectives.

Going Green with Six Sigma

September 5, 2011

The efficient approach to Going Green for any company is to follow the five phased DMAIC improvement process of Six Sigma.  Going Green can mean different things to different organizations.  You will have to define what Going Green means for your organization.

Defining your problems with waste management and setting your goals for waste reduction and savings is the first step.  The structured approach of the Define Phase in a Six Sigma project is the best approach to accomplish this.  The deliverables are your Problem Statement, Goal Statement, Constraints, Assumptions, Guideline’s for the Team, Green Requirements, and a Project Plan.  Types of waste that are often tackled are:

  • Cardboard,
  • Wood Pallets and Crates,
  • Banding,
  • Plastic,
  • Rags,
  • Cans and Bottles,
  • Paper,
  • Metal,
  • and Hardware.

For these types of waste establish the baseline of Total Pounds of Waste, the Good is Recycled Pounds, the Bad or Defect is Land Fill Pounds.  Use this to set your process yield and process sigma level in the Measure Phase.

The Measure Phase for Going Green is all about establishing how you will measure your waste as previously defined and establishing your organization’s baseline performance.  Without the baseline performance you won’t be able to measure the green impact and savings from your Going Green Six Sigma Project.  One approach is analogous to the Mass Balance equation where Mass is conserved between inputs and outputs which must remain equal.

The Mass Balance Equation

Total of Material and Consumables Input = Output of Saleable Goods and Services + Waste to Atmosphere + Waste to Water Supply + Waste to Landfill + Hazardous Waste + Recyclables 

Your organization will have to determine the extent to apply this equation.

In the Analyze Phase the Team evaluates the waste categories and how and where they are created.  Is it a process issue, a policy issue, or just that we have always treated waste that way?  Once you understand where it is coming from then you can develop the creative solutions that will transform landfill waste into recyclable waste.  Depending upon the scope of the project the team may also be addressing other waste components of the mass balance equation.

In the Improve Phase the Team investigates alternatives for how to handle the multiple waste categories and how to minimize their creation.  Many items that were always sent to the landfill if separated can become recyclable.  In many cases recyclables can generate revenue.  The costs of storage and hauling can then be reduced.  This in turn changes the ratios of Total Waste to Recyclable Waste and to Landfill Waste.  Going Green has cost reduction and revenue enhancement benefits.

In the Control Phase the Team implements the policies, procedures, and work instructions to handle the waste categories.  Arrangements are made with waste and recycling organizations to handle the waste categories per the improvements identified.  Ongoing measurements are put in place to continue to drive landfill waste reduction and increase recyclables.  Similarly if the project scope was larger the other categories of waste would be included as well.  This is how Going Green is accomplished with the Six Sigma DMAIC approach to solving problems.

Tracking Performance over Time

July 22, 2011

Tracking performance over time can be accomplished using either one of two methods which are Run Charts or Control Charts.  Both methods use time as the baseline and the performance measure as the measurement that is tracked over time.  The major differences in the methods relate to the measures of demarcation on the charts.  Run Charts have a center line that represents the mid point of the measurement that is being tracked.  Control Charts have a center line that represents the average of the measurement that is being tracked and lines above and below the centerline that are estimates of 3 standard deviations about the average of the measurements.

Run Chart and Control Chart compared

In both of the charts time is the X axis.  The data is plotted in succession over time.  The charts can be segmented by specific time periods such as setting the baseline and after improvements have been implemented.  You will easily see the before and after results.  We can measure the difference between the before average and the after average to calculate the magnitude of the improvement.

Control Chart with Before and After Results

Tracking of performance is also a control for maintaining the gains from the improvements.    The Run Chart or the Control Chart provides a method to continuously evaluate performance and point out when corrective actions should be taken or when the process should be left alone.

Whenever we contemplate improving a process the baseline for the critical performance metric(s) must be established before any corrective actions are taken.  By doing this you will always be able to evaluate the impact of the improvements by measuring from the baseline to the future state of process performance.  In the rare case where the corrective action doesn’t work the tracking charts will point that out quickly so an alternative action can be taken.  I am sure that you can remember when a great idea just did not work so it is always best to track performance to validate the actual impact of our improvement efforts.

Performance Measurement

July 17, 2011

Measuring performance is the key for driving dramatic improvements in any organization.  Choosing the right performance measures, or metrics, is essential to hone the focus of improvement project teams.

The key to honing the focus for the project team is to select measurements that are relevant to the level of the organization that is being impacted by the improvement project.  If the team is working on improvements at the work cell, or production line level within the organization having measurements that resonate with the Corporate Level of the organization won’t make much sense.  The measures must be selected that are appropriate for the level of the organization where the improvements are being made.

Examples of performance measures and the level within the organization follow:

Corporate Level

  • Return on Net Assets
  • Market Share
  • Total Stockholder Return
  • Capacity Utilization
  • Economic Value Added

Division Level

  • Customer Loyalty
  • Target Cost Attainment
  • Market Share by Division
  • Order Fulfillment Cycle Time

Business Unit Level

  • Business Unit Revenue
  • Business Unit Margin
  • Quality Cost
  • Process Efficiency
  • Staffing Plan Attainment

Work Cell / Production Line

  • Cycle Time
  • Process Yield
  • Employee Satisfaction
  • Outgoing Quality

A rating scale can be used to help with selecting the Key Performance Metric, or the CTQ (Critical to Quality) Metric, that will drive the improvement at the given level within the organization.  The rating scale follows:

Rating Scale for Performance Measures

Relevance

  1. Not at all linked to strategic objectives
  2. Poorly linked to strategic objectives
  3. Indirectly linked to strategic objectives
  4. Strongly linked to strategic objectives
  5. Directly linked to strategic objectives

Usefulness

  1. Too detailed to provide useful information
  2. Rarely provides useful information
  3. Occasionally provides useful information
  4. Usually provides useful information
  5. Constantly provided useful information

Understandability

  1. Very complex, hard to understand
  2. Understandable with study
  3. Neutral
  4. Fairly easy to understand
  5. Very easy to understand

Availability of Data

  1. Would be very difficult to obtain
  2. Will have to be measured manually
  3. Can be obtained by combining information on different reports
  4. Can be easily derived from information on existing reports
  5. Currently available from existing reports

Overall Average Score

  1. Extremely poor indicator / motivator
  2. Poor indicator / motivator
  3. Average indicator / motivator
  4. Good indicator / motivator
  5. Excellent indicator / motivator

The metric with the highest overall score should be used to drive, monitor, and maintain the gains form the improvement efforts.  Choosing the right performance measures is the key for driving dramatic improvements in any organization.

Control Strategy that Works

July 12, 2011

Maintaining the gains from operations improvements is challenging, but not insurmountable.  It all starts at the beginning of your improvement project before you have made any changes.  The following steps are a guide to make your improvements stick!

  • Before and After Measurements
    • Pick one key performance metric that resonates with the process personnel.
    • Establish your baseline performance before making improvements or changing anything.
    • Track the performance over time for this one metric with a control chart or a run chart to show the before, during, and after improvement stages for the process.
  • Operational Definitions
    • Document what was changed or improved
    • Document the steps taken for the corrective actions that drove the improvement
    • Update or develop work instructions that clearly describe how to do the impacted process activities correctly and consistently.
    • Make sure that the work instructions, or procedures, are U-SMART (Useful, Specific, Measureable, Not Ambiguous, Repeatable, and Terse and to the point).
  • Control Plan
    • Name the owner of the process.
    • Identify where and who will measure your key performance metric.
    • Determine the frequency of measurements and updating of the tracking mechanism (control chart or run chart).
    • If something goes wrong name the corrective action takers.
    • Make a list of corrective action steps based upon the corrective actions that have already been implemented to resolve the past performance issues.
    • Keep all measurements, work instructions, process procedures, and corrective action steps visible for all process personnel to have ready access.

You can now run your process and maintain the gains from your improvements.  The Control Strategy that Works starts and ends with the measurement system.  We know where we are before we make changes and then validate the gains after implementation of corrective actions.  Keep on measuring to maintain those gains!

Design of Experiments Process

June 16, 2011

The objectives for conducting a designed experiment are the following:

  • Find the most important factors/variables affecting a response(s).
  • Determine the best settings to improve the response(s) for the important factors.
  • Determine the cost effective settings for the factors that are not important.
  • Provide the required information in a timely, efficient and cost effective manner.

The Elements of an Experiment

The Design of Experiments Process

Benefits

  • Manufacturing Cost Savings
    • Scrap
    • Inspection
    • Rework Losses
    • Capital Material
    • Variation
  • Design Cost Savings
    • Delivery Cycle
    • Engineering Design Charges
    • Assembly Material, Labor and Overhead
    • Total Product Cost
  • Marketing Cost Savings
    • Properly allocate resources
    • Stop spending on Promotions that Don’t Work
    • Better understand what makes Customers choose your business

Key Strengths

  • Robustness against uncontrollable factors
  • Obtains required information in a cost effective manner
  • Identifies factors for cost savings
  • Results are reproducible
  • Can improve quality without incurring capital and material cost increases
  • Separates the Vital Few from the Trivial Many

To get started we offer a Design of Experiments Basics Course

Functional Cost Modeling

June 15, 2011

There are two pieces to a Functional Cost Model.  The first is the Functional Model of the product or process.  The second is a comprehensive cost analysis which includes material, labor, allocated expenses, allocated assets, production processing and supporting processes, outsourcing, shipping, installation, service, warranty, and end of life.  After these two components have been created blending them together yields the Functional Cost Model.

The Functional Model

A functional model comprises the Prime Function, Tier 1, Tier 2, and in some cases Tier 3 sub-functions.  The Prime function for a product, or a service, describes in 10 to 15 words or less just what the product or the service is supposed to do.  Once that “What” for the prime function has been nailed down then the question becomes “How” is the “What” achieved.

The Tier 1 functions provide how statements required to achieve the prime function.  Then the Tier 1 functions become the “What” has to be achieved and the Tier 2 functions provide the how statements.  This “What” “How” relationship continues until the functional tree is completed.


Functional Model for an Elevator System


For processes the functional tree usually gets to the third tier where the process steps are reached.  For products the tiers may go beyond the third tier, or as far as needed until the BOM elements, production process steps, systems, installation processes, or servicing processes are reached.  The BOM elements can be a system, sub-system, or an individual component.

Comprehensive Cost Analysis

If a process is being analyzed each step in the process requires a complete cost breakdown from the customer demand for the service to final delivery of services and any remedial activities.

If a product is being analyzed the data includes all of the costs from product conception to end of product life.  The complete supply chain must be considered.  All outsourced activities must be considered.

Functional Cost Model

The final step in Functional Cost Modeling is gluing the Functional Model and the Comprehensive Cost Analysis together.  Costs are assigned to the Functional Model at the appropriate level whether BOM, process, system, sub-system, or other activity.

Once the functional cost model is complete, roll up the costs, look for the high cost functions, and then attack the high cost functions for possible ways to reduce the costs.  The functional requirements for a product or a service are driven by the voice of the customer.  How we choose to deliver those functions is where the creativity comes into play with the design and thus the cost.

The functional cost model is the basis for the Product Cost Reduction Process and Process Design for Six Sigma.